Time machine
Replaying a past moment of the plant on 2D and 3D screens with the values, alarm list, screen trace and input trace recorded by Live: opening, timeline, playback, going back from an alarm or an action, following the Live display and the displays of browser users, recording settings and limits.
What it is used for
Live continuously records all tag values shown on the screens and the alarm list. When the operator picks a past moment, the plant is replayed as it was at that moment: 2D and 3D screens, menu bars, the alarm line, alarm views and trend views show the recorded moment. You follow on the screen itself what happened before a fault, which motor stopped first and which alarm came first.
The recording also keeps the display: during replay you can see which screens and windows were open on the Live display, where the operator moved the mouse, where they clicked and which value they entered. The displays of users connected from a browser are also recorded and can be watched (Screen trace and input trace).
During replay the plant keeps running live: alarm detection, scripts, scheduled tasks, the archive, reports and drivers work with live values, and browser viewers see the live screen. Only this Live screen shows the past, and no commands can be given from this screen during replay.
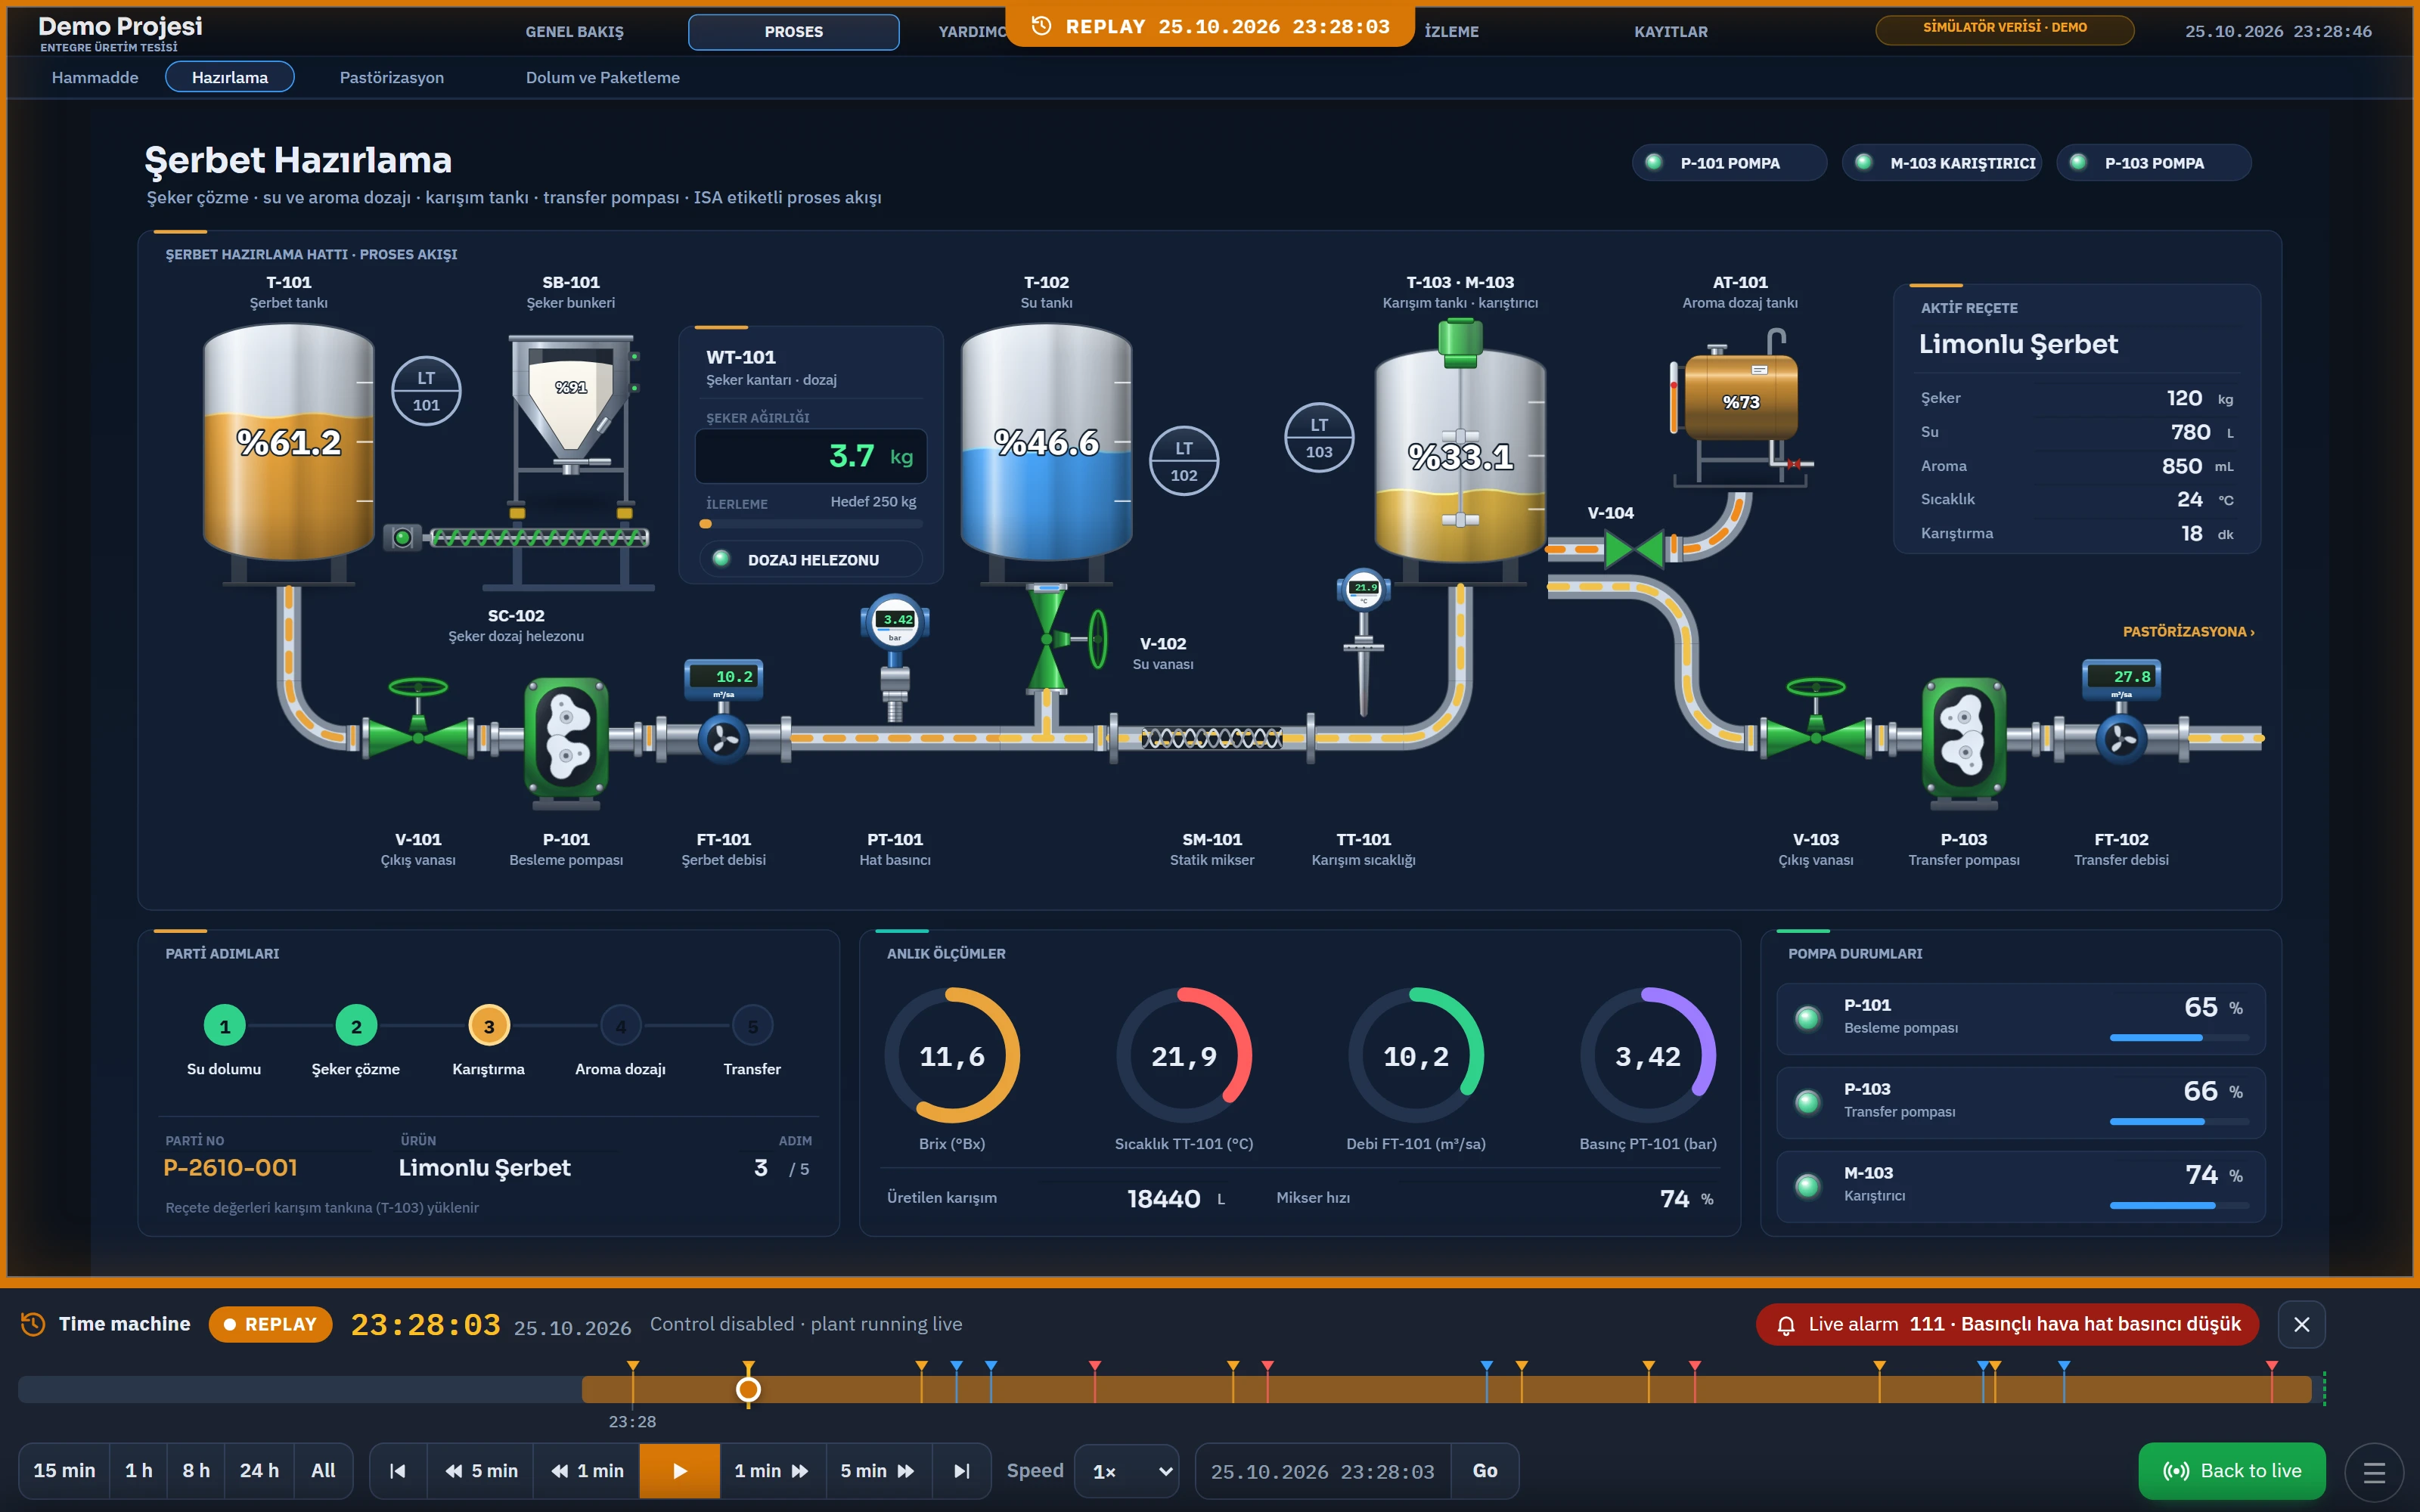 12345
- Replay — the screen shows the past; next to it the replayed moment.
- Status — Live / Replay / Playing.
- Timeline — recording, incoming alarms, replayed moment.
- Replay — alarm by alarm, minute by minute, play / pause.
- Back to live
License and prerequisites
- The time machine is a separate license module:
FV-TM-P(perpetual) orFV-TM-A(annual). The license file must be on the Live computer; see Installation › License and activation. Without the license, Live does not record and Time machine… does not appear in the system menu. - In the trial version, the time machine works without a license.
- In Studio, Live settings›General›Time Machine › Enable recording must be on (on by default).
Opening the time machine
- System menu: ☰ › Time machine….
- Key: on the Live settings›Keyboard tab, assign a key to the Time machine action. The same key opens the panel; while the panel is open, it closes it and returns to live.
- Button: add the Open the time machine function to an object event. If Value is empty, the panel opens live; if a number is entered (e.g.
15), it goes that many minutes back. See Function reference.
The panel sits below the screen area; the screen area becomes smaller. When first opened, the screen is live: the green Live badge lights at the start of the panel.
Panel
 1234567
- Status and speed
- Replayed moment
- Incoming alarm — tap to replay from 30 s before the alarm.
- Timeline range
- Play / pause
- Speed — 1× … 300×
- Go to date / time
Status line
- Badge: Live (green), Replay (paused replay) or Playing and the playback speed (orange).
- Time and date of the moment shown. In live mode the clock runs.
- Information text: during replay Control disabled · plant running live; with no recording No recording at this moment (Live was closed).; countdown Returning to live: … s.
- Live alarm (red, flashing): a new alarm came in the plant during replay. Clicking it returns to live.
- ×: returns to live and closes the panel.
Timeline
- Filled sections are the time covered by the recording; in the empty places Live was closed (or recording was off).
- The triangles at the top are incoming alarms; the color is the incoming color of the alarm class. Hovering shows the alarm text.
- The dashed green line at the right edge is the present moment. The orange line and the round handle are the replayed moment.
- Tap or drag the timeline: it goes to that moment. The mouse wheel zooms in / out while keeping the moment under the pointer fixed.
- Tap an alarm triangle: it goes to 30 seconds before the alarm, replay starts at 1× speed and, if the alarm’s source object is defined, it goes to the object (shown on a 2D screen or in a 3D scene; see Alarm view).
- The small diamonds below the recording track are action markers (see below).
Buttons
| Button | What it does |
|---|---|
| 15 min, 1 h, 8 h, 24 h, All | The time span the timeline shows. All shows the whole recording. |
| Previous alarm, Next alarm | Goes to the alarm before / after the replayed moment (30 s before the alarm, plays at 1×). |
| 5 min and 1 min back / forward | Shifts the replayed moment by this amount. In live mode the forward buttons are disabled. |
| Play / pause | Plays the recording at the selected speed or pauses it. Disabled in live mode. |
| Speed | 1×, 2×, 5×, 10×, 30×, 60×, 120×, 300×. |
| Follow Live screen | When on (default), screens, windows, the pointer and typed values are shown during playback as recorded. The selection is remembered on this computer. |
| Display | Whose display is watched: Live computer or a browser user / additional monitor whose screen trace was recorded. Not visible if no other display is recorded. |
| Date / time and Go | Type 25.10.2026 14:32:07, 25.10.2026 14:32 or only the time 14:32 (today; if that is in the future, yesterday) and go to that moment. |
| Back to live | Ends the replay; the screen shows live values. The panel stays open. |
During replay
- Pick a moment
Tap the timeline, tap an alarm triangle or type a date / time. An orange frame appears around the screen area with the Replay label at the top; the replayed moment is written next to the label.
- Navigate between screens
While Follow Live screen is on, the display automatically opens whichever screens and windows were open in Live at that moment. To look at another screen, use the screens in the system menu, the navigation buttons, pop-up windows, 3D views and layer buttons; each screen opens with the values of the selected moment. If you change the screen manually, the screen trail stops for that playback and the panel says Screen trail stopped: the page was changed manually. Turn it back on with “Follow Live screen”.
- Play
With the play button the recording runs at the selected speed. At a recording gap it jumps to the next recording (Recording gap skipped: … min). When the present moment is reached, the screen returns to live by itself.
- Return to live
Press Back to live. All screens are redrawn with live values. If the screen trail is on, the screen that was open before playback is restored.
- Control is disabled: writing tags from objects (button, switch, slider, input field, selection list), event functions (except navigation functions), recipe operations, alarm acknowledgment / shelving / comments are not carried out. An attempt opens the Watching a recording: control disabled window in the middle of the screen; its Back to live button ends the replay.
- Values: values recorded with bad quality (connection lost, address error) also appear with bad quality during replay (
####in a numeric field). There is no recording for tags added after the recording. - Alarms: the alarm line, the current / unacknowledged / shelved lists and counters of the alarm views show the list at the selected moment. The fault wave is also drawn from the recorded values. New live alarms are announced in the panel as Live alarm; if an alarm view with an audible alert is open, the live alarm sound keeps playing.
- Trend: trend views in live mode draw from the archive the time range ending at the selected moment. Direct tag curves (without archive) collect no samples during replay.
- Automatic return to live: if the screen is not touched for the Return to live (min) time (default 10 min), Live returns to live and writes a
sistementry in the event log. In the last 60 seconds the panel shows a countdown.
Screen trail and input trail
Along with the values, the screen itself is also recorded. This is not a video recording: Live records the state of the display and, during playback, rebuilds the same screens with live rendering.
| Recorded | Details |
|---|---|
| Open screen and windows | Main screen and pop-up windows (faceplates together with their tag prefixes). |
| Mouse / touch | Cursor position (at most once every 100 ms), clicks (left, right, touch). |
| Keys | Special keys only: Enter, Esc, Tab, F1 – F12, arrow keys, Home / End / PageUp / PageDown and Ctrl / Alt + letter. Typed characters are not recorded as keys. |
| Value entries | Open windows (value input window, confirmation prompts), the on-screen keyboard and the field that has the focus; the values typed in them. Password fields and fields whose name contains sifre, parola, password or pin are recorded only as dots (••••). |
| User | The user logged on in Live at that moment. |
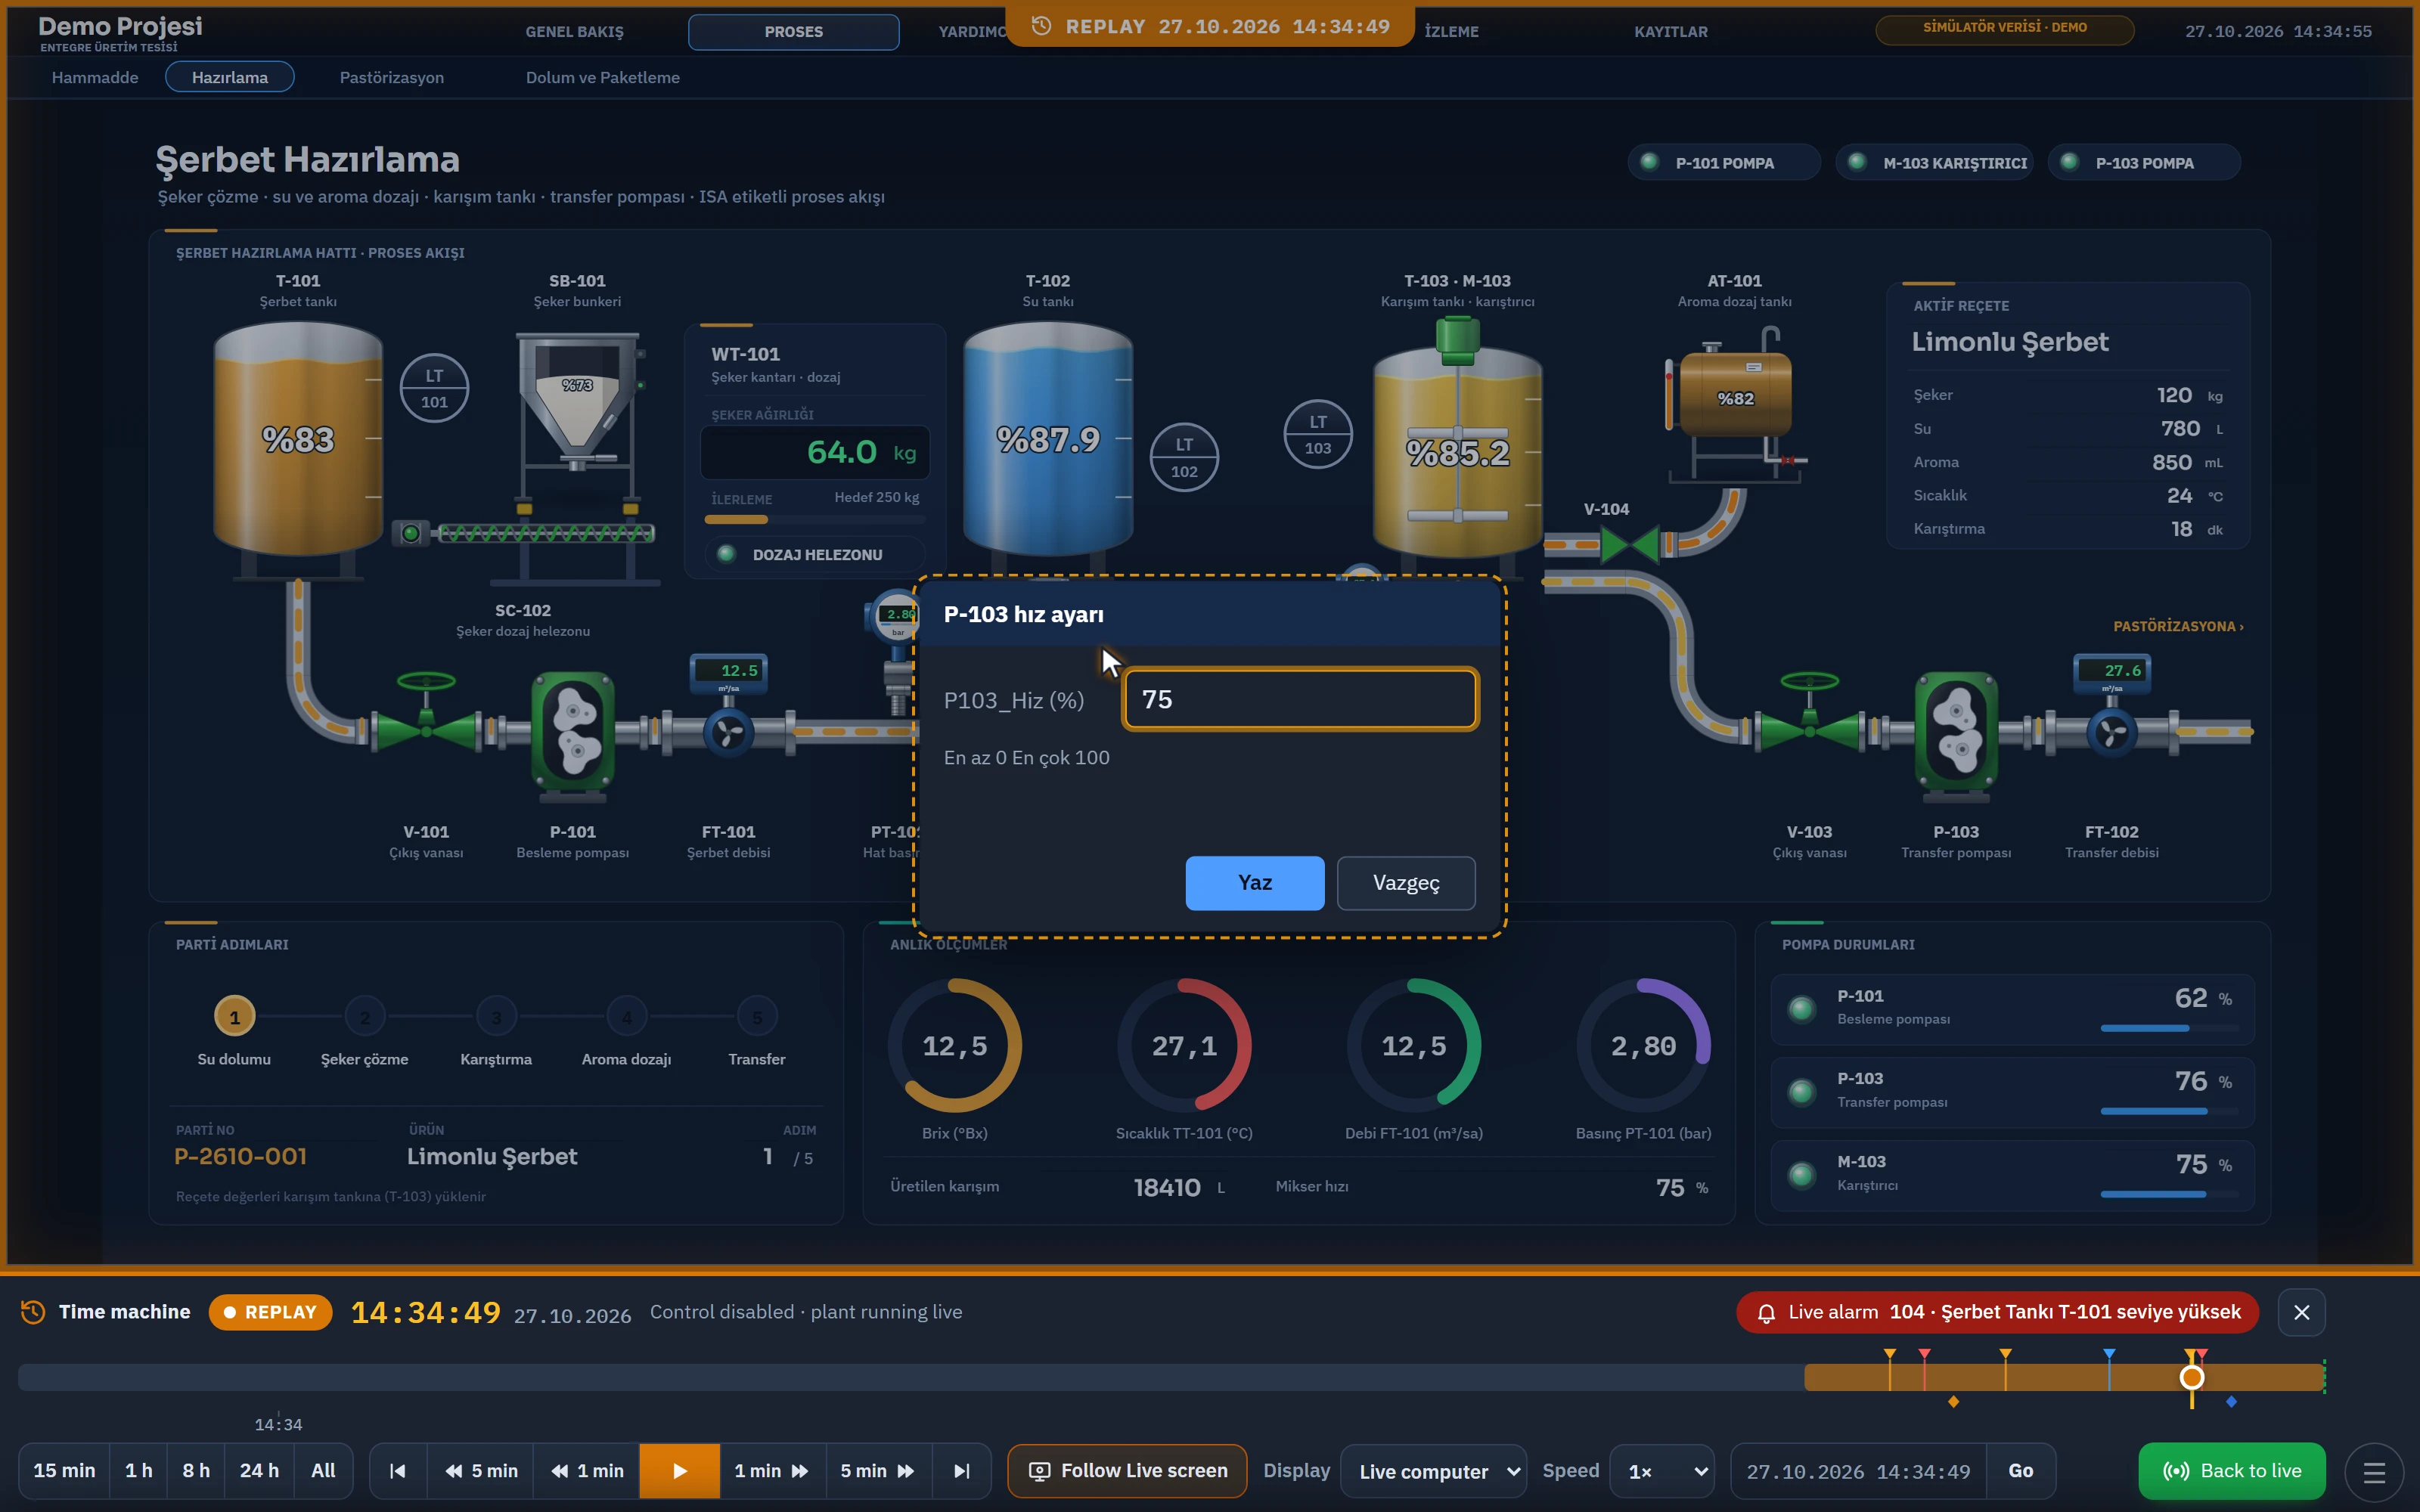 12345
- Recorded cursor — where the operator moved the mouse.
- Ghost window — the value window open at that moment and the value being typed (not clickable).
- Follow Live screen — screen, windows and input trail as recorded.
- Display — the Live computer or a browser user.
- Action marker — operator action (blue), remote control (orange).
While Follow Live screen is on, during playback the recorded cursor, the click ring, the badge of the special key pressed and the windows open at that moment are shown as ghosts. A ghost window has a dashed frame, shows the value being entered and cannot be clicked. Next to the cursor, the name of the logged-on user (or of the browser user being followed) is shown. While Follow Live screen is off, the cursor and ghost windows are not shown. Actions on the display during playback are not recorded.
Action markers
On the timeline, operator actions are shown below the alarms as small diamonds. The source is the operator action log in the event log: tag writes and unauthorized attempts (Live settings›General›Operator action log; see Live settings).
- Blue: an action by the operator in Live. Orange: a remote control action from a browser. Red border: a rejected or unauthorized action.
- On hover, the time, the user and what was written are shown. Tapping it jumps to 5 seconds before the action and plays at 1×. Tapping a remote control marker follows that user's screen.
 1234
- Remote control action — orange; tapping it shows that user's screen.
- Tooltip — time, who, what was written.
- Follow Live screen
- Display — whose screen is followed.
Browser users' screens
If the time machine is enabled in the project, the screen trail and input trail of users connected from a browser (monitoring or controlling) are also recorded on the Live computer. Each user's recording is kept separately. Additional monitors (Monitor 2, Monitor 3 …) in the Separate screen on each monitor layout are also recorded separately. TV displays are not recorded.
- Select a user in the Screen selection of the panel. The periods during which the selected user was connected are shown on the timeline as a thin purple line; during playback, the screens that user opened, the user's cursor and the values the user typed are shown.
- If the user was not connected at that moment, the panel says … was not connected at this moment.; the screen does not change.
- Selecting Live computer returns to the recording of the Live screen.
- A note in the browser user's system menu states that screen navigation, mouse movements and value entries are recorded.
Recording settings
The settings are in Studio in the Live settings›General›Time Machine group.
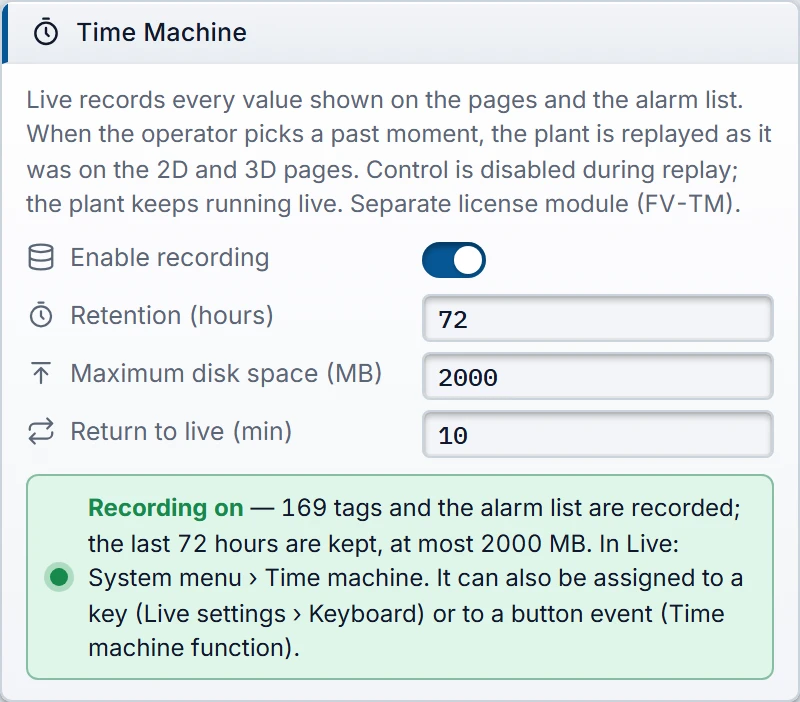 1234
- Enable recording
- Retention — hours.
- Disk limit — when exceeded, the oldest hours are deleted.
- Return to live — if not touched (min).
- Enable recording
- On by default. When off, Live does not record and Time machine… does not appear in the system menu.
- Retention (hours)
- Default 72. Records older than this are deleted (1 – 8784).
- Maximum disk space (MB)
- Default 2000. When recordings exceed this size, the oldest hours are deleted. The space used depends on the number of tags and how often the values change.
- Return to live (min)
- Default 10. If the screen is not touched for this long during replay, it returns to live;
0never returns.
How recording works
- Every 0.5 seconds Live checks the value of all tags and writes the ones that changed; every five minutes it writes a full copy of all values and the alarm list. Even without changes, a recording line is written at least every 30 seconds.
- The recordings are written to hourly files in the
zaman\subfolder of the project’s.verifolder (yyyyMMdd_HH.zk); completed hours are compressed (.zk.gz).zaman\ozet.jsonholds the recording ranges. See Files and folders of Live. - The screen trail of browser users and additional monitors is written in the same format to the
zaman\ekran\<kullanıcı>\folders; the display name is in thead.txtfile in the folder. The retention period also applies to them; the disk limit of each is one tenth of the Maximum disk space (MB) value (at least 20 MB). - Retention and disk limit are applied at most every 10 minutes.
- In a redundant server pair the master writes the recording; the time machine does not open on the standby server. Browser monitoring and TV have no time machine.
Limitations and points to note
- During replay the objects’ On change events do not run; in screen open events only navigation functions run.
- Scripts and tasks read and write live values during replay.
- While an hour file is being read, Live may briefly show Reading the recording… on this screen.
- The time machine has not been tried over a long period in a plant with real PLCs; the recording size varies with your plant. The input trail (mouse, clicks, value entries) increases the recording size. In the first days, watch the size of the
zaman\folder.