Panel components and DIN rail snapping
The Panel Components group and the Siemens / ABB subgroups: enclosure, rail, PLC, protection, drive and door devices. Snapping devices to the DIN rail, the mounting plate, the door and the MCC drawer; the contents move together with the enclosure.
What the group contains
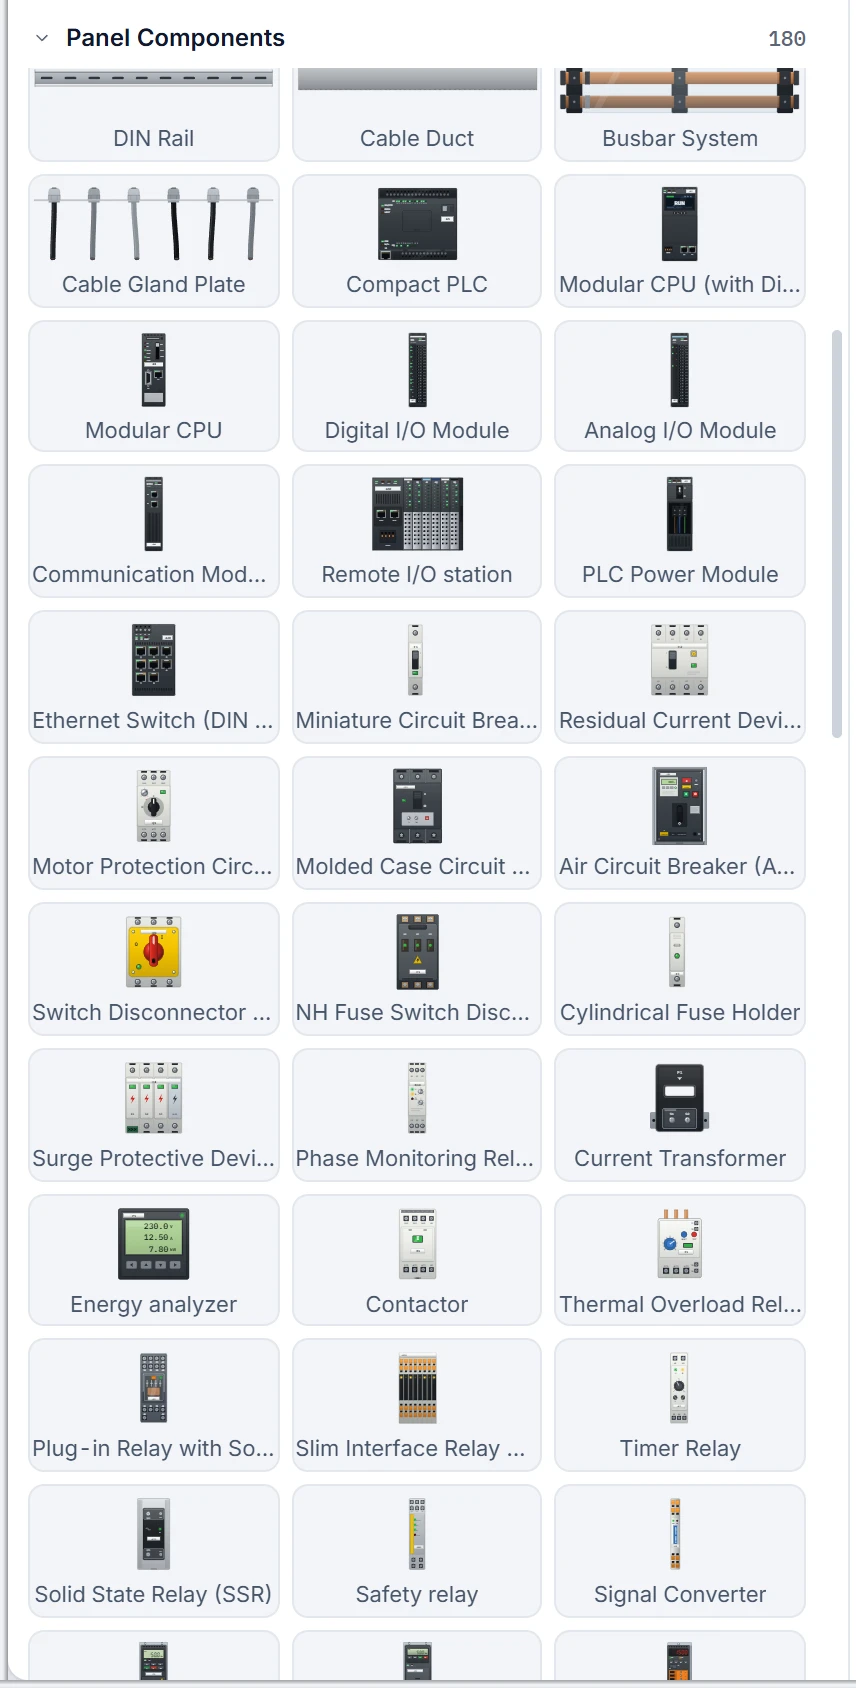
The Panel Components group contains 94 generic objects that are placed inside PLC and MCC panels and on their doors. Below the group there are two more subgroups: Siemens (51 objects) and ABB (35 objects); they are described below. All objects have a 2D, a 3D Standard and a 3D Realistic model. The generic objects in the table below do not depict a specific brand or model; they have no brand, logo or model number. To build a panel step by step with these objects, you can use the Panel design wizard.
| Family | Object | Examples |
|---|---|---|
| Enclosures and supports | 13 | Open Enclosure, Multi-Section MCC Panel, Multi-Section Enclosure (Bayed Suite), Wall-Mounted Enclosure, Control Desk, Field Junction Box (Terminal Box), Push-Button Enclosure, MCC Drawer Unit, Mounting Plate, DIN Rail, Cable Duct, Busbar System, Cable Gland Plate |
| PLC and network | 9 | Compact PLC, modular CPU, digital / analog I/O, communication module, remote I/O station, Ethernet switch |
| Protection and switchgear | 12 | Miniature circuit breaker, residual current device, motor protection circuit breaker, molded case circuit breaker, air circuit breaker, load break switch, surge protective device, energy analyzer |
| Relays | 8 | Contactor, thermal overload relay, auxiliary relay, timer relay, solid-state relay, safety relay |
| Drives and power supply | 10 | Frequency converters, servo drive, soft starter, line reactor, EMC filter, DIN rail power supply, DC UPS, control transformer |
| Terminals and climate control | 10 | Terminal block group, earthing busbar, service socket, panel lighting, panel fan, enclosure cooling unit, heater, thermostat |
| Door elements | 10 | 22 mm push button, illuminated push button, selector switch, pilot light, potentiometer, 40 mm emergency stop, door-mounted main switch handle |
| Meters and door panels | 7 | Panel-mount analog / digital meter, temperature controller, digital counter, door-mount operator panel, name / warning plate |
| Power distribution | 9 | Automatic transfer switch, distribution block, comb busbar, electricity meter, power factor correction capacitor, reactive power controller |
| Accessories | 6 | Terminal end stop, EMC shield busbar, C Profile / G Rail, door limit switch, document pocket, ventilation grille |
Siemens and ABB panel equipment
These objects are drawn with the shape, color and dimensions of the corresponding product series; the type label on the front (CPU 1515-2 PN, C16, S201 C16, ACS580 …) matches the series. The manufacturer's logo, brand lettering (SIEMENS, SIMATIC, SIRIUS, SENTRON, SINAMICS, ABB, Tmax, Emax …) and order number are not drawn on the objects. The series name appears only in the object name and in the bill of materials (S7-1500 CPU, SIRIUS 3RT2 Contactor). The product model is selected in the object's options, such as Device model.
In the Toolbox, in the 3D library and in the Add menu they appear as subgroups of Panel Components named Siemens and ABB (Subgroups). In the title row of the object's right-click menu the group is written as Panel Components › Siemens or Panel Components › ABB.
| Siemens family | Object | Objects |
|---|---|---|
| S7-1500 | 5 | S7-1500 CPU, S7-1500 Signal Module, S7-1500 Power Module, S7-1500 Communication Module, S7-1500 Mounting Rail |
| S7-1200 and LOGO! | 5 | S7-1200 CPU, S7-1200 Signal Module, S7-1200 Communication Module, LOGO! Base Module, LOGO! Expansion Module |
| ET 200 and SCALANCE | 6 | ET 200SP Interface Module, ET 200SP I/O Module, ET 200eco PN I/O Module, ET 200AL Module, SCALANCE XB-000 Ethernet Switch, SCALANCE XC-200 Managed Switch |
| SINAMICS drives | 6 | SINAMICS G120 (CU + PM240-2), SINAMICS G120C, SINAMICS V20, SINAMICS S120 Booksize Module, SINAMICS V90 Servo Drive, SINAMICS S210 Servo Drive |
| SIRIUS switching | 6 | SIRIUS 3RT2 Contactor, SIRIUS 3RU2 Thermal Overload Relay, SIRIUS 3RV2 Motor Starter Protector, SIRIUS 3RA2 Load Feeder Combination, SIRIUS 3RW Soft Starter, SIRIUS 3RM1 Motor Starter |
| SIRIUS relays and SIMOCODE | 6 | SIRIUS 3UG Monitoring Relay, SIRIUS 3SK Safety Relay, SIRIUS 3RQ Interface Block, SIMOCODE pro Basic Unit, SIMOCODE Current Measuring Module, SIMOCODE Operator Panel |
| SENTRON | 8 | SENTRON 5SL Miniature Circuit Breaker, SENTRON 5SV Residual Current Device, SENTRON 5SD7 Surge Protective Device, SENTRON 3VA Molded Case Circuit Breaker, SENTRON 3KD Switch Disconnector, SENTRON 3NP1 NH Fuse Switch Disconnector, SENTRON 3WA Air Circuit Breaker, SENTRON PAC Power Monitoring Device |
| SITOP, HMI and IPC | 6 | SITOP Power Supply, SITOP UPS1600 DC UPS, SITOP UPS1100 Battery Module, SIMATIC HMI Operator Panel, SIMATIC IPC Box PC, SIMATIC Panel PC |
| Enclosures and terminals | 3 | ALPHA Distribution Board, SIVACON S8 Cubicle, 8WH Terminal Block Group |
| ABB family | Object | Objects |
|---|---|---|
| AC500 | 6 | AC500 CPU, AC500-eco CPU, S500 I/O Module, AC500 Communication Module, S500 Remote I/O Interface, CP600 Operator Panel |
| Drivers | 7 | ACS150 Frequency Converter, ACS355 Frequency Converter, ACS380 Frequency Converter, ACS480 Frequency Converter, ACS580 Frequency Converter, ACS880 Frequency Converter, MicroFlex e190 Servo Drive |
| Switching and control | 8 | AF Contactor, TF Thermal Overload Relay, MS132 / MS165 Manual Motor Starter, MS132 + AF Starter Combination, NF Contactor Relay, OT Switch Disconnector, Softstarter (PSR / PSE / PSTX), Compact 22 mm Pilot Device |
| Modular devices | 8 | S200 Miniature Circuit Breaker, DS201 RCBO, F200 Residual Current Device, OVR Surge Protective Device, CM Monitoring Relay, CT Timer Relay, Sentry Safety Relay, M4M Network Analyzer |
| Power | 3 | Tmax XT Molded Case Circuit Breaker, Emax 2 Air Circuit Breaker, CP-E Power Supply |
| Enclosures and terminals | 3 | SNK Terminal Block Group, Mistral65 Distribution Board, System pro E Enclosure |
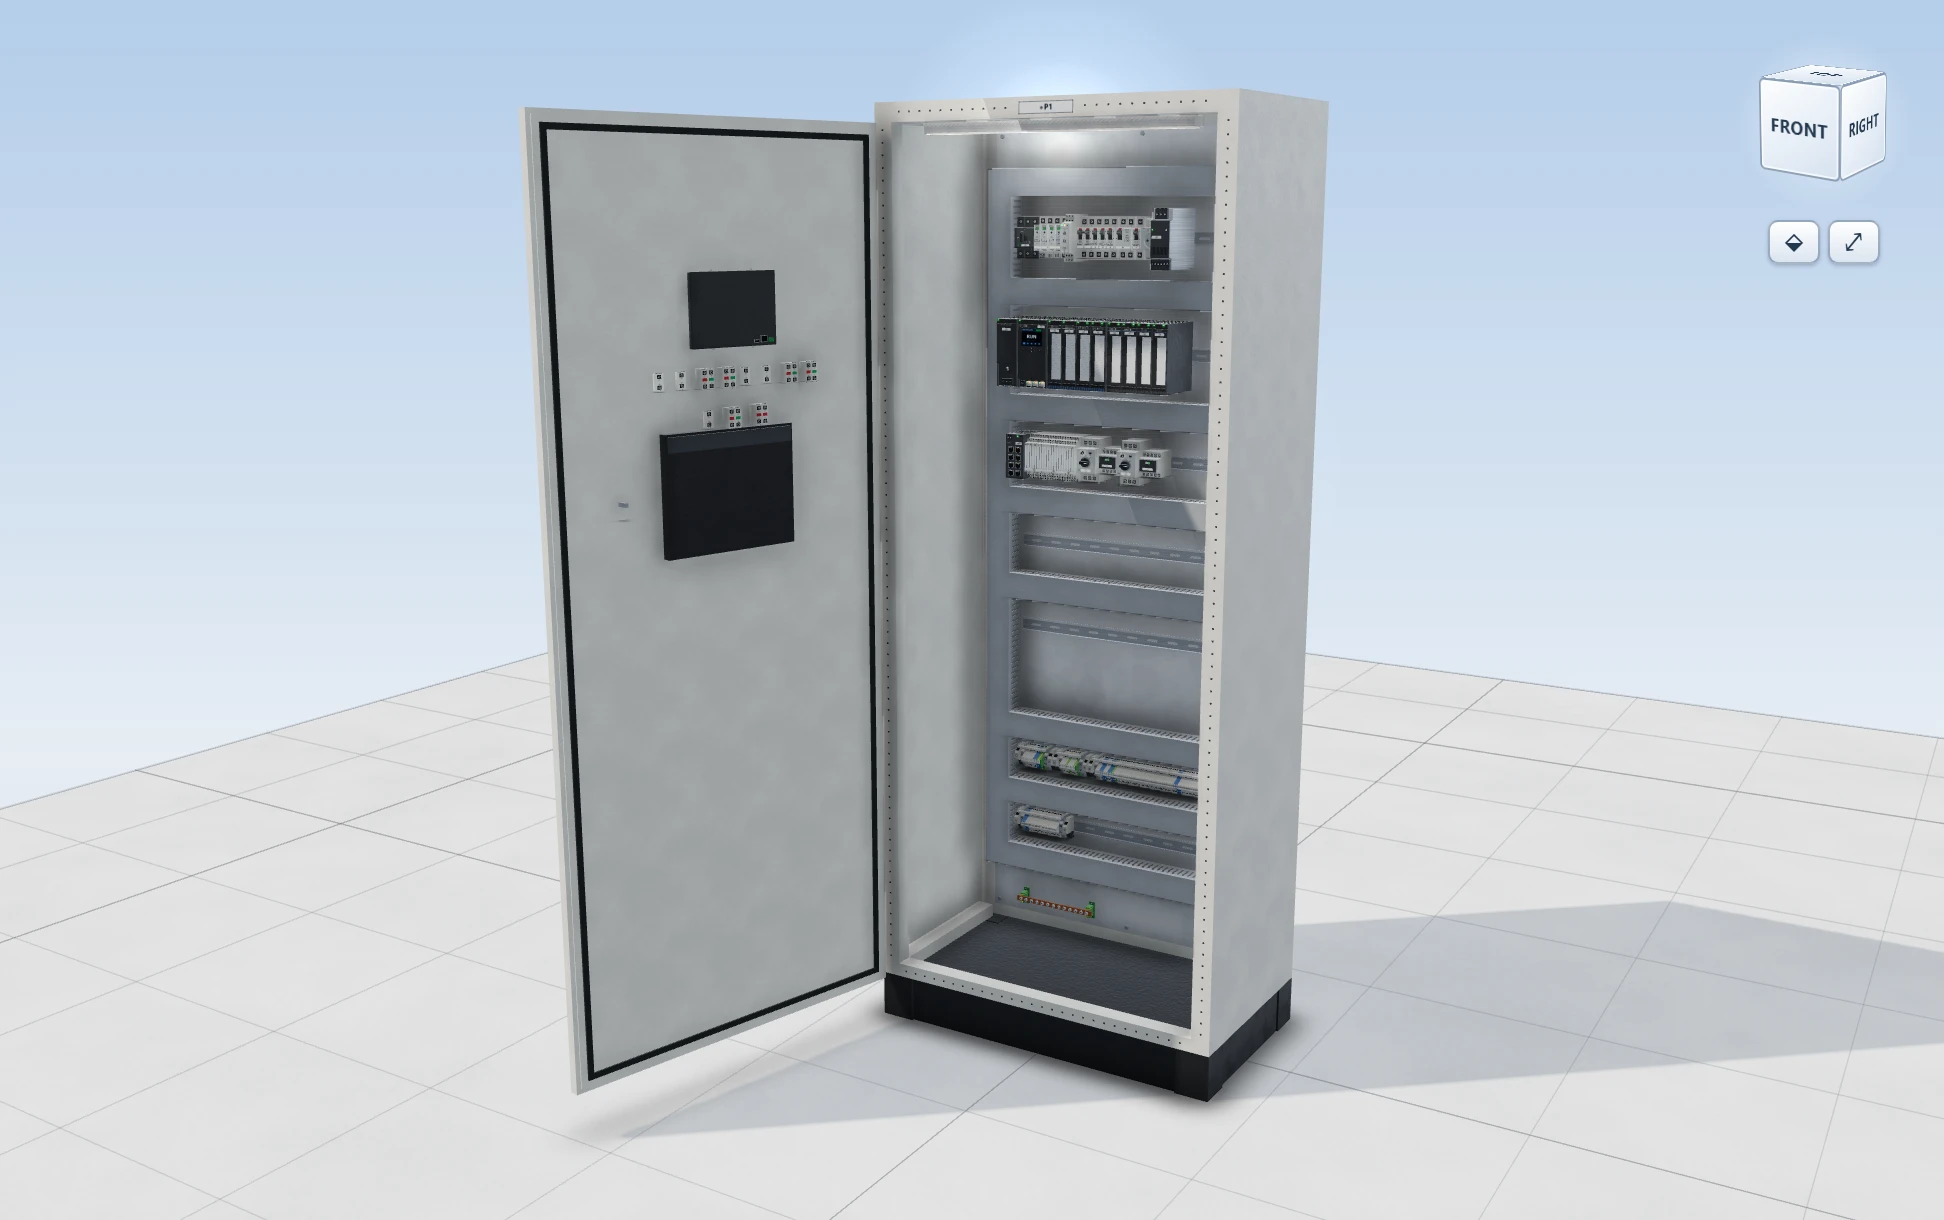
Mounting is the same as for the generic objects (sections below): modules and switchgear snap to the DIN rail, large devices to the mounting plate, operator panels and 22 mm control devices to the door. ALPHA Distribution Board, SIVACON S8 Cubicle, Mistral65 Distribution Board and System pro E Enclosure are carriers: they have doors, devices snap inside them and onto their doors, and their contents move with them. For some objects the mounting type depends on the selected model; for example, the PAC2200 model of the SENTRON PAC Power Monitoring Device snaps to the rail and the PAC3220 model to the door, and the M1M model of the M4M Network Analyzer snaps to the rail.
Dimensions
Objects are drawn at their real dimensions. On a 2D screen, at the default size 1 mm = 1 pixel; in a 3D scene dimensions are in meters. When you change a property that changes the dimensions (for example the number of poles of a circuit breaker, the width of an MCC drawer), the width and height of the 2D object are updated automatically. For a rail-mounted device the center line of the rail stays in place, for the others the bottom edge.
What sits where
Every device has a mounting type. Carrier objects (panels, junction box, push-button box, mounting plate, DIN rail, C profile) provide the surfaces on which devices sit.
| Mounting type | Mounting surface | Example devices |
|---|---|---|
| Rail-mounted | DIN rail or G rail (on the center line of the rail) | Circuit breakers, contactor, relays, terminals, PLC modules, DIN rail power supply |
| Screwed to the plate | Mounting plate (a separate plate or the panel's or junction box's own plate) | Frequency converters, DIN rail, cable duct, busbar system, filter, transformer |
| On the door | Panel door, control desk front, holes of the push-button enclosure | 22 mm door devices, meters, door-mounted operator panel, main switch handle |
| Withdrawable drawers | Drawer compartment of the MCC panel | MCC Drawer Unit |
Rail snapping switch
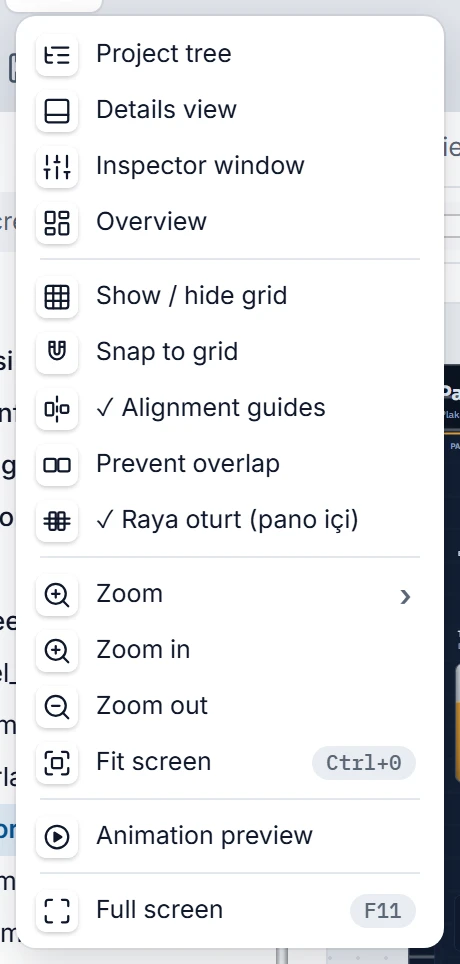
Snapping is on by default. It is switched on and off in three places:
- The Snap to rail button in the editor bar (Snap to rail / mounting plate in the 3D toolbar),
- View›Snap to DIN rail (panel) (Snap to rail / mounting plate (panel) on a 3D screen),
- Snap to DIN rail (panel) in the menu that opens when you right-click an empty spot on the canvas.
If Alt is held down while moving, snapping is turned off for that moment and the device moves freely. When the device snaps to a surface, the status bar shows Snapped to surface: <carrier name> — Alt: move freely.
 1
- Snap to DIN rail (panel) — on when checked; on a 3D screen Snap to rail / plate.
Placing on a 2D screen
- Place the carrier.
Place the enclosure, the mounting plate and the DIN rails. The rails must be horizontal: the angle of the support must be 0° or 180°.
- Move the device onto the rail.
Drag the device from the Toolbox and drop it onto the rail, click on the rail while the tool is selected, or drag the device that is already on the screen. When the vertical center of the device comes close to the center line of the rail (about 14 screen pixels), it snaps to the line. The device must overlap the rail by at least 30%. While you move it, the center line of the rail is shown as a dashed line.
- Push it against its neighbor.
When the left or right edge of the device comes close to a neighboring device on the same rail or to the end of the rail (about 8 screen pixels), it butts against it. In this way the devices are lined up without gaps.
- Move it freely if necessary.
If you move the device while holding Alt, it ignores the rail.
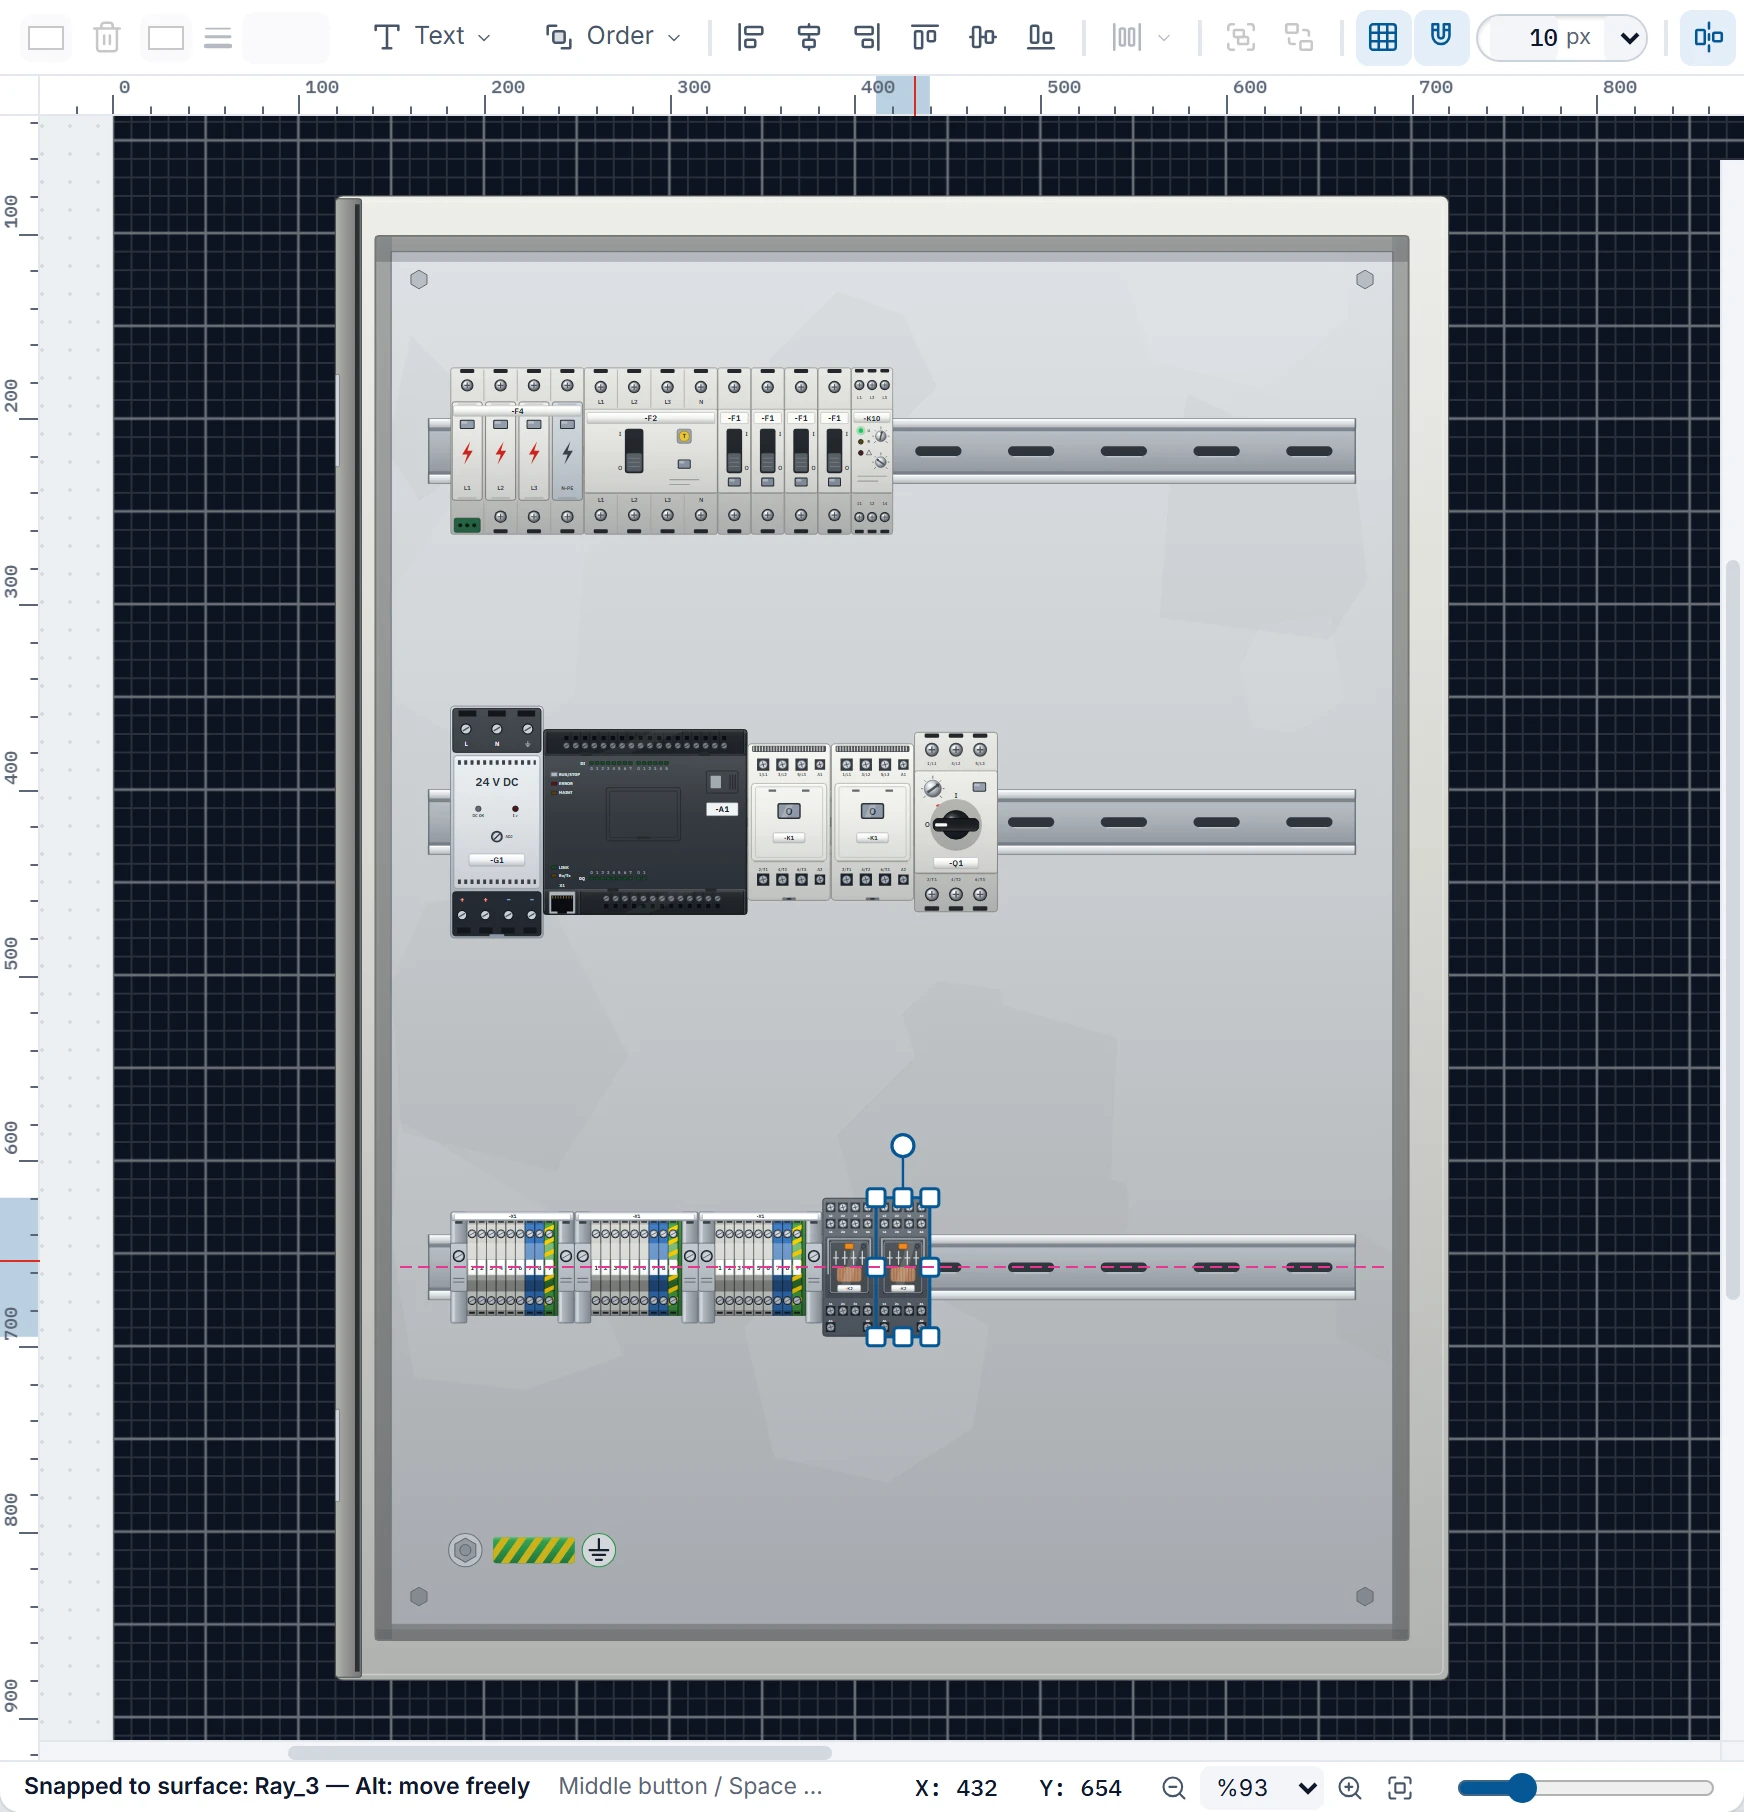 1234
- DIN rail — the carrier of the DIN-rail devices on it.
- Snapped device — its vertical center on the center line of the rail, butted against its neighbor.
- Dragged device — near the rail it is pulled to the center line.
- Bottom bar — Snapped to surface: …; while Alt is held down, the device moves freely.
- MCC drawer: when the center of the MCC Drawer Unit enters a drawer compartment, it snaps to the center of the compartment. If the drawer is half as wide as the compartment, it snaps to the nearer left or right half. Its bottom edge is positioned in 25 mm steps.
- Push-button enclosure: when a door-mounted device (22 mm push button, lamp …) approaches a hole of the Push-Button Enclosure, it snaps into the nearest hole.
- In 2D, plate-mounted devices and devices placed on the panel door are not snapped; place them freely.
Placing in a 3D scene
In 3D, when the cursor is in front of a mounting surface, the device snaps to that surface: its back touches the surface and it turns to face the same direction as the surface. Surfaces: DIN rail, mounting plate, the plate of an open panel or wall-mounted enclosure, the surface of doors and of the control desk front, MCC compartment.
- When you select an object from the library and move it over the scene, a ghost preview appears on the surface; clicking places the device there.
- When you drag a device in the scene, it slides along the surface. When the cursor leaves the surface, the device goes back to being moved on the ground.
- A rail-mounted device snaps when it comes within 2.5 cm of the rail center line and butts against the neighboring device within 8 mm. A device screwed to the plate is placed where the cursor is.
- A door-mounted device sits in the nearest hole within 3 cm in a push-button box. An MCC drawer sits in the middle of the compartment (in one half if it is half-width); its bottom edge is placed in 25 mm steps.
- No snapping takes place when the surface is viewed from behind.
- A device can also be placed on an open door. The device is saved at its position on the closed door and swings together with the door.
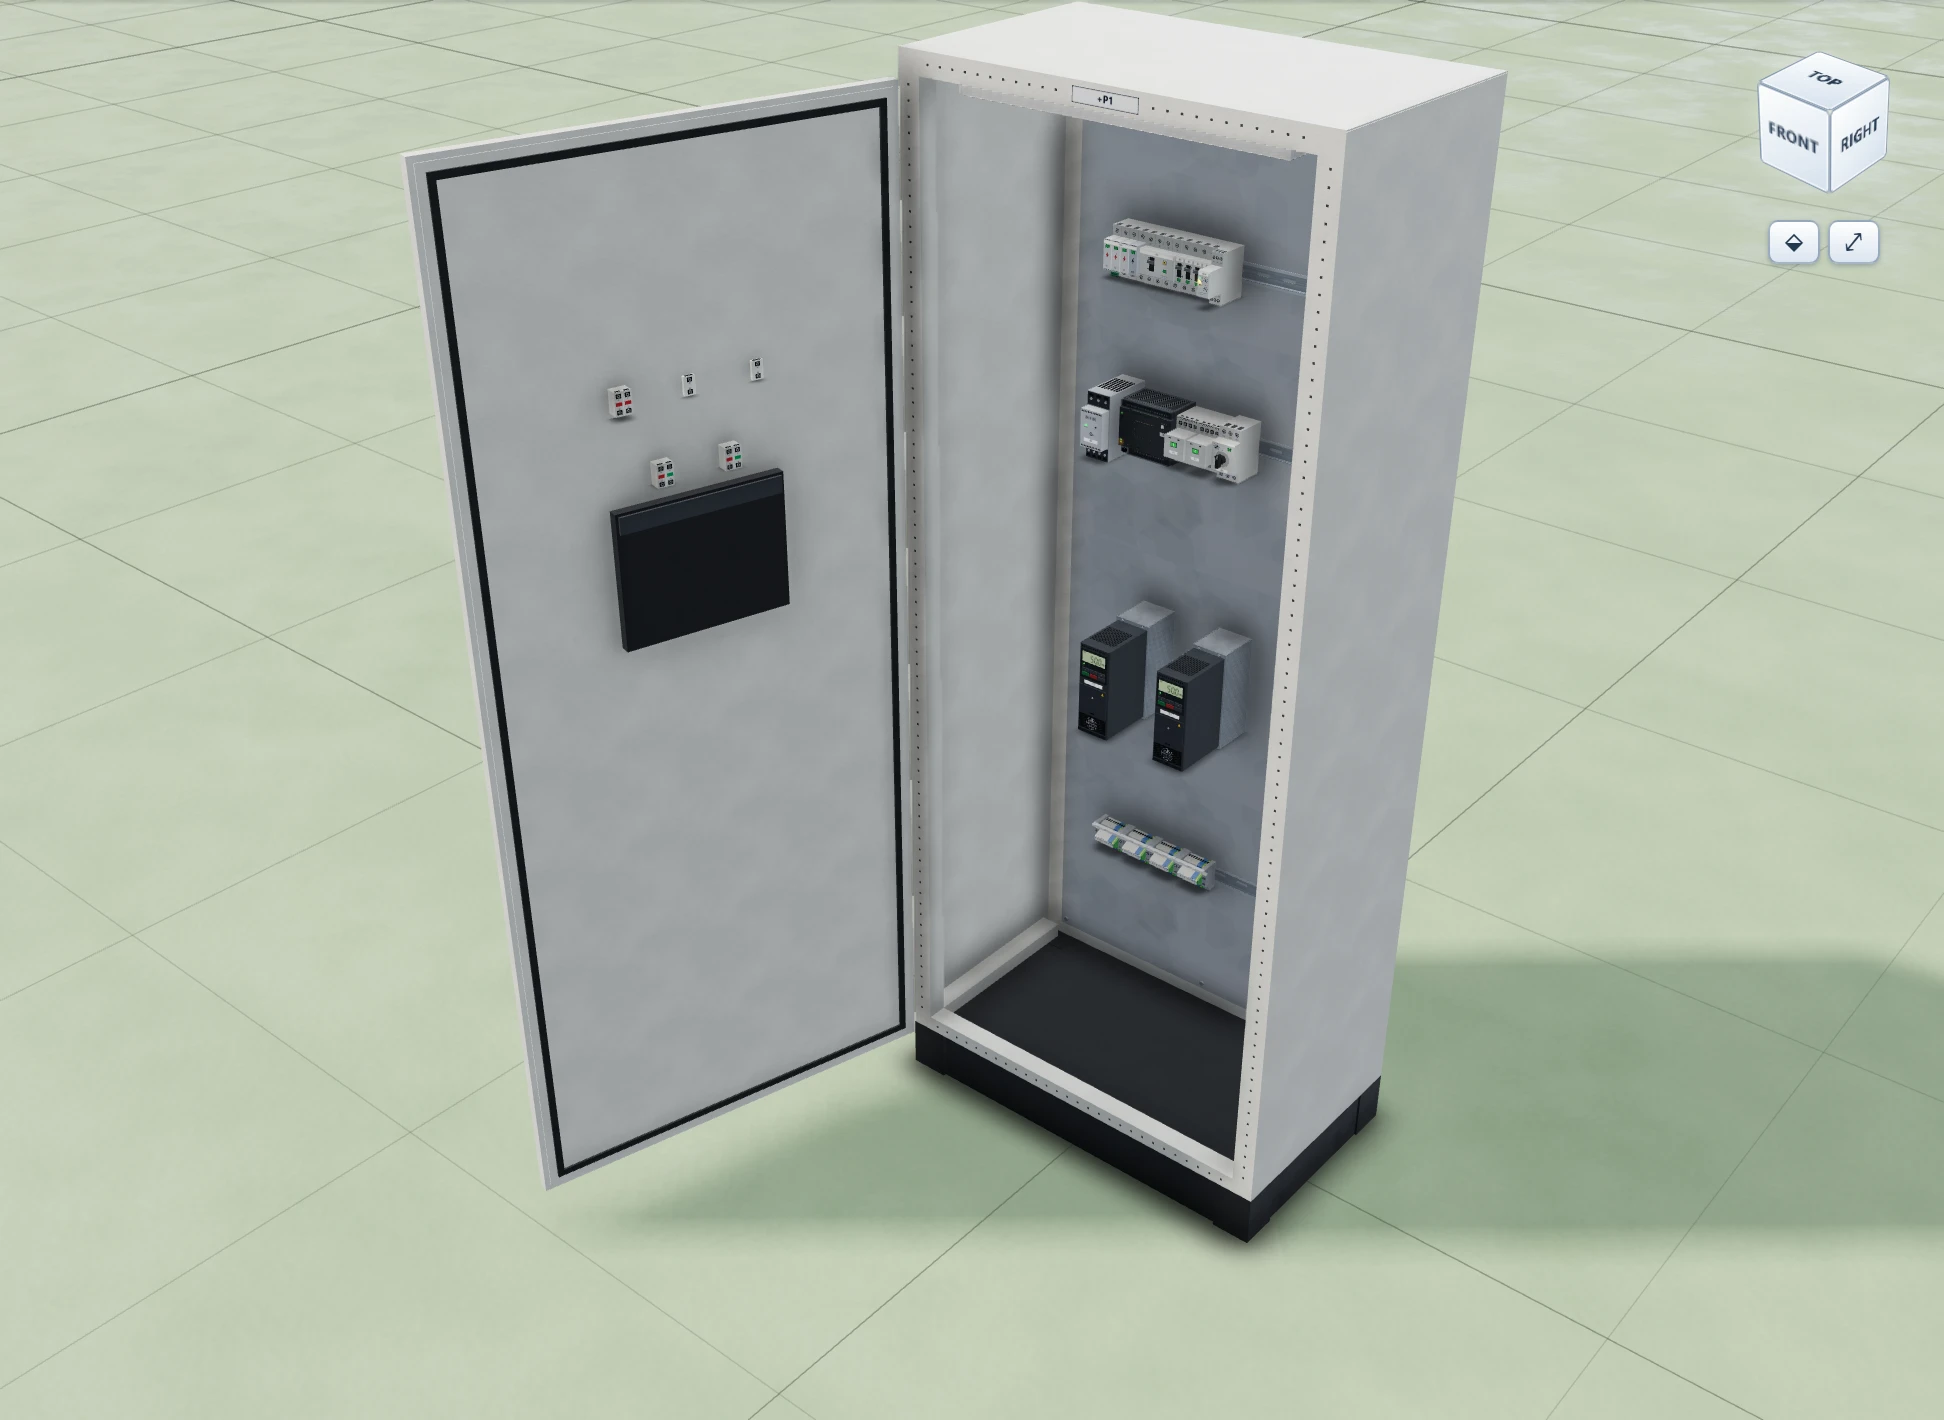
Door and door-mounted devices
Enclosures have the Door open property in the Door open group. Multi-section panels have a separate property for each section (Section 1 door open, Section 2 door open …). These properties can be linked to a tag (Dynamization). The Open Enclosure is inserted with its door open.
The hinge side of a single-leaf door is selected with the Door hinge property in the same group: Left (default) or Right. This property exists in Open Enclosure, Wall-Mounted Enclosure, Control Desk and Field Junction Box (Terminal Box); in multi-section panels each section has its own property (Section 1 door hinge …). On a double-leaf door the hinges are on the two outer edges and the property has no effect. The hinge is on the same side in 2D and in the 3D Standard and Realistic models; the devices on the door turn with the door in that direction.
- 3D (Studio and Live): when the door opens and closes, the devices on the door rotate with it.
- 2D Studio: devices on a door that is open are drawn faded.
- 2D Live: while the door is open, the devices on the door are hidden; they reappear when the door closes.
In 2D, for a device to count as mounted on the door, it must have been drawn after the panel (be in front of it), neither of them may be rotated, and the center of the device must be inside the door surface.
Moving together with the carrier
When an enclosure, mounting plate, DIN rail, junction box or push-button enclosure is moved, the objects inside it and on it move by the same amount. Nested objects come along too: when the enclosure is moved, the plate, the rails on the plate and the devices on the rails move with it.
| Which operations move the contents | Which object counts as "inside" | |
|---|---|---|
| 2D | Dragging with the mouse, arrow keys, changing X / Y in the Inspector | An object drawn after the carrier (in front of it) whose center lies inside the carrier. On a DIN rail: a rail-mounted device whose vertical center lies on the center line of the rail. |
| 3D | Dragging with the mouse, arrow keys, PageUp / PageDown, rotating (Q / E, rotate handle), changing the position, angle and floor in the Inspector | An object inside the volume of the enclosure or junction box; an object in front of the plate or rail (up to 50 cm); a door-mount device on the door surface. |
This link is not saved in the file; it is determined from the current positions of the objects each time they are moved. If you move a device outside the carrier, it no longer moves with it.
Limitations and points to note
The full list of the group is in the Object catalog. For using the Toolbox see the topic Toolbox and object library, for the 3D editor see 3D screens.